Thursday, April 25, 2013

Work in Progress


Miraculously, I was able to find my camera download cord so I can share some pics of our progress! Our house is 3/4 packed into the garage and kids rooms - chaos!

99% of the floors have been ripped up to sub floor level, with only one patch of remaining ugly lino to go! Not too many sub floor surprise issues so far, thank goodness! Our bamboo installers are arriving next Wednesday and Thursday, so we're making fine progress.

On Monday, in the middle of everything, I had my wisdom teeth removed which has slowed me down . . . . a lot. Not sure what I think about it, but I'm getting my strength back day by day and I'm hoping to chip in again soon (pardon the pun).

So here's some pics with descriptions of the action!

Lower set of stairs minus carpet and devoid of the 5 000 staples I had to pull out!


I decided that stripping the paint from the balustrade and stair surrounds would give the best finish. These will be painted white, as will the stair risers (with bamboo tread). You can just see the very (un)attractive vinyl flooring which we found under the carpet. This is the entry way - imagine walking in the front door to THAT! ERGH!


We had to sprinkle baby powder as we removed the vinyl as the sub floor is very tacky from the old adhesive. Smells gross . . . but it works!


And just when we thought the ugly vinyl was gone, we found this under the carpet in our new bedroom. 


What was this . . . 


Is now this . . . (we're aiming for the shabby student pad look!)


My study that isn't a study, we even had to shift the Sylvanian Family homestead! Ergh, that vinyl!  


The playroom. The only concrete floor in the house and I have my fingers crossed that it's level. We found some funny scrawling from the original owners and messages from the builders, so we decided to write some of our own.
 

 I'm so glad 'Trever' cleaned up his pile of dust 24 years ago!


And lucky last, this is part of our upstairs 3-way bathroom. It's being renovated as we wanted the new flooring to go under a new wall hung vanity. I couldn't get a 'before' shot because hubby and our neighbour (the plumber) ripped it out before I could find my camera. To give you a visual, it was a custom built 1980's vanity with gold trimmed white taps and matching white and gold handles. Very retro. Very GONE! 
 

Onwards and upwards until next week when I'm really looking forward to sharing some pics of the new flooring! :-)


Saturday, April 13, 2013

It's all about the bamboo!

I've been quiet for some time now, for two reasons. Firstly, we've had a break in our renovations (mainly due to exhaustion of body and budget!) and secondly, I started a new position at a new school this year which has left spare time for . . . well, nothing!

School holidays have finally arrived and that means that we are embarking on the second stage of our renovations - flooring.

A few months back, we were fortunate enough to win a competition where we won $3000 worth of flooring from Choices! A most welcome boost to our renovation budget, this meant that we were able to go ahead with our flooring plans at least 6 months ahead of schedule. The $3000 took care of the deposit and that money was redirected to other projects!

We have decided on Embelton Natural Bamboo after considering a range of hardwood flooring. We really need light and bright in our house, so we finally settled on the natural colour. I chose Embelton Bamboo because it has a more consistent finish than other brands of bamboo flooring, which I dislike due to their streaky, watercolour type finish.

We also chose Embelton bamboo because it;
  • is a 100% Australian owned company who has provided us with outstanding customer service
  • is sustainable
  • has a Janka rating of 16 (highly attractive feature with 3 kids plus neighbours kids trampling through our house!!)

Today I started pulling up the carpet . . . and I have the blisters to prove it!

I started with the stairs and I was greeted by at least 300 staples stuck fast into the wood. Armed with a hammer, screwdriver and pliers, I got to work removing them. What a chore!

Before . . . . 

During . . . . (I think those marks are the builders boot scuffs from the original build!)
Then I pulled up the carpet in our entryway and HELOOOOOO 1989!! Noice, different, unuuuuusual!
This is what I am aiming for it to look like AFTER! I know, not bamboo, but you get the picture! Bullnose tread, white painted riser.
My next challenge is the rest of the rooms and removing all of the skirting boards. I've done a 50cm section and it nearly killed me. Off to trawl You Tube and Google to find an easier way!

Stay posted - plenty more to come! :-)


Sunday, November 25, 2012

Moving into the Mastersuite

I sit and type, completely and utterly knackered! I found a new form of cruel torture today and it's painting ceilings. The . . . absolute . . . pits. I will bribe someone else to do it for me next time. Funny thing is, the cheapest and most simple ceiling paint was the best to work with. It was even quite hot today and it behaved beautifully. The only nice thing about painting ceilings.

I was determined to complete the room today, so I trotted off to Bunnings this morning to get the paint and a roller on a pole. Such glamorous purchases. I prepped the room ala 'Dexter' style to ensure that no paint touched my pretty grey walls and I could get the cornices undercoated and painted as quickly as possible. I'm getting really good at being clever and efficient when it comes to painting. I even discovered that cranberry juice is not only good with vodka.


Wouldn't look out of place in Dexter's lair . . . . . hehehe!


Oh the fun of it! I think he looks so much better with my little makeover. Best thing about protecting the walls like this is that I got to catch up on the news on my way around. Did you know that Colette Dinnigan just had another baby, a boy, at the age of 47? Fascinating.


So on I plodded and finished the cornices AND ceiling and the the great move began. Do you remember when the room used to look like this?


Well now, it looks like THIS! (Insert Happy Dance!)


Part one of my vision is complete! I'm finding it hard to believe, but my body is telling me otherwise!

I chose a grey/white colour scheme for the whole room as I just adore the serenity of the colours. I will, of course, add more accents along the way. I have found that dark timber or black accents beautifully with this colour scheme, so I'll be keeping my eye out for some special pieces over the holidays. 

I think people get concerned about using too much white, but it can easily be balanced by the use of textures. I certainly have plenty of texture in my bedlinen and cushions, great for Ms Tactile!


All of my cushions came from Freedom. I find they are the best for on trend items that aren't ridiculously expensive and I do love looking at their pretty displays! I got these ones using the voucher my sister gave me for my birthday back in March. The smaller cushions remind me of ones my Grandma has, a pretty shantung silk texture. 

My bedside tables were bought off eBay for the grand total of $50 - for BOTH! They came with the gorgeous glass knobs and I must say, I do love them. My other Grandma used to have furniture with similar Queen Ann legs. Funny how things go full circle!


My lamps were purchased a little while ago at Bunnings for $59 each. One of very few pretty things I've ever found at Bunnings, they were also the right price. Not like that 'other' lighting store who perform daylight robbery with their prices! I'm really pleased with the look so far, it's very close to what I had in mind. The only thing missing now is our built-in and timber floors, but they'll have to wait until after New Years. 

Now that's done, I can open my doors each morning and gaze at my next project!


Eeeeeek! Think I'd better shut the doors, lay down and gaze at my greenery instead. :-)

Sunday, November 18, 2012

Cornices & other conundrums

I am proud to announce that we completely avoided having to pay the ridiculous $100 delivery fee for the cornices. The cornices didn't even cost $100 for goodness sake! I passed the problem onto the brains trust and they put their brains together and worked it out! :-)

I'm happy to say that all the cornices are now up. My excitement was soon dampened when I realised that it means MORE cleaning & painting for me (GASP! There's plaster on my pretty grey walls). The ceilings will also need doing again due to the patchy holes from the old fluoro lights. Think I'll just turn up the music, sing at the top of my voice and try to forget that my arms are being tortured once again!


The cornices are also up in Room 2 and some more plastering means that this room is also nearly done. And we all know what that means now don't we?


Then we have the conundrum. A patch of ugliness consisting of sewer pipes and remnants of the brick wall. It's here because this will eventually be a doorway into our ensuite (currently just a toilet and laundry on the other side). I'm hoping that the nice built in wardrobe people (yet to be found) can fashion a temporary closet for us so the bricks really will be no more! Think I'll hide the iron AND the ironing in there :-)


Tomorrow, I will pay my friendly paint man at Bunnings another visit. Love it when he calls me 'love'.

Saturday, November 3, 2012

Blinds and Doors galore!

Even more progress today, which was really pleasing!

We managed to install two of the four blinds we ordered and also got the doors hung! 'We' means myself and my sister and brother-in-law. After all, many hands make light work!

I ordered the blinds from my sister and brother in law who have an eBay store that sells a range of great blinds. You can find their store here. I decided on dual roller blinds for the two windows in the bedroom (light filtering teamed with blockout) and chose stark white to continue the soft grey/white colour scheme.

Here's the daytime shots I promised, complete with blinds!


I mocked up the skirting board for that one. We're not putting them on until we replace the flooring. I'm aiming to make my life easier, so we can live without them until then!

This pic is probably the closest to the colour Tranquil Retreat in real life. Tricky to capture with the camera.


And voila! Pretty doors hung and ready to sliiiiiiiide! No door frames yet. I'm giving myself a break!


Now to go and resign myself to ordering and paying way too much for delivery of our cornices. Dammit, but it has to be done!

Friday, November 2, 2012

Paint, paint and more paint

Please, no more paint.

I am pleased to announce that room 2 is 98% complete! I have decided that cornices and hung doors only account for 2% (cough), makes it sound just that much closer to the finish line!

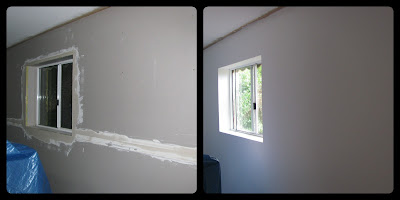
I have pretty much spent the last few weeks of my life painting, usually late at night when I should have been tucked up in bed. After undercoating with the most awfully thick 3 in 1 paint, I was then able to apply my long awaited finishing colour. I originally chose Dulux Tranquil Retreat, first for its name, secondly because I am a bit in love with grey/white colour schemes at the moment. On testing, I decided that the full strength colour was way too dark for this particular space. I settled for Tranquil Retreat half strength which has given us a really soothing soft grey.

Couldn't wait until morning, so I apologise for these night pics! Will take more in the daylight.


Oh, did I mention that I made the window frames all by myself? So clever that mitre box and me!

Trims and doors have been painted in Dulux Aquanamel, untinted white. I have a love hate relationship with Aquanamel. This evening I discovered that it behaves much better when the temperature is under 20 C and humidity is moderate. On other days it has been akin to painting sticky white honey uphill. I bought a 10L tin of the stuff, so I have to make it work!


Doors are all painted and ready to hang tomorrow. Yes, more painting!


Then there's room 2. Well, still a work in progress! Once we get our cornices delivered (when I negotiate the ridiculous $100 minimum delivery charge) I think I'll really feel like it's almost all done. Shouldn't be too impatient - finished plaster means more painting for me! Bring on those Lotto numbers!

Saturday, October 13, 2012

Nearly all stitched up

The title of this blog post has dual meaning. Yes, our renovations are well on their way to being finished. They may have been finished by now if I hadn't had a little accident last Sunday!

Whilst preparing to add the second coat of undercoat to the main room, my foot found a broken picture frame. The glass corner of the frame was broken, unbeknown to me, in a sharp hook shape. My foot found it, 6 stitches and a lot of claret later, I found myself ground to a halt. Saying that I was angry with myself was an understatement. I was glad that it didn't happen to one of the kids and lucky it didn't hit a main vein.

Stitches come out tomorrow and I am relatively mobile today, so I added the second coat of undercoat. I have discovered that undercoating is my least favourite job, it's like running on the spot - BORING! Room 1 is now ready for the colour coat, window architraves and cornice. I'm not revealing the colour choice for this room just yet!


No more ugly fluoro lights either, all gone with some lovely ceiling fan lights in. I ended up saving about $90 each on these fans as I caught them on the last day of a sale at Cetnaj, Erina. Just have to wait for not-so-handy-man to patch the holes in the ceiling before it can be repainted.


My lovely new doors are undercoated on one side, ready for their other side to be done tomorrow. My foot was yelling at me to stop, so I listened. :-)


Unbelievably, I've gone through 3/4 of the 10L prep/undercoat tin. At $119 a pop I'm not happy about that! Room 2 needs some more plaster finishing before it gets its first coat. With cornice, doors, skirting and room 2 to go, I think I will need to visit the Bunnings paint aisle . . . . AGAIN.


Tomorrow I'm heading off to buy the window architraves and I'll try my hand at installing those myself. It'll be worth the work as then Room 1 will be ready for the final paint touches - one step closer to moving in. :-)